
Telepresence Quick Start
In this guide you will explore some of the key features of Telepresence. First, you will install the Telepresence CLI and set up a test cluster with a demo web app. Then, you will run one of the app's services on your laptop, using Telepresence to intercept requests to the service on the cluster and see your changes live via a preview URL.
Prerequisites
It is recommended to use an empty development cluster for this guide. You must have access via RBAC to create and update deployments and services in the cluster. You must also have Node.js installed on your laptop to run the demo app code.
Finally, you will need the Telepresence CLI. Run the commands for your OS to install it and login to Ambassador Cloud in your browser. Follow the prompts to login with GitHub then select your organization. You will be redirected to the dashboard; later you will manage your preview URLs here.
 macOS
macOS
# 1. Download the latest binary (~60 MB):sudo curl -fL https://app.getambassador.io/download/tel2/darwin/amd64/latest/telepresence \-o /usr/local/bin/telepresence# 2. Make the binary executable:sudo chmod a+x /usr/local/bin/telepresence# 3. Login with the CLI:telepresence login
 Linux
Linux
# 1. Download the latest binary (~50 MB):sudo curl -fL https://app.getambassador.io/download/tel2/linux/amd64/latest/telepresence \-o /usr/local/bin/telepresence# 2. Make the binary executable:sudo chmod a+x /usr/local/bin/telepresence# 3. Login with the CLI:telepresence login
Cluster Setup
You will use a sample Java app for this guide. Later, after deploying the app into your cluster, we will review its architecture. Start by cloning the repo:
git clone https://github.com/datawire/amb-code-quickstart-app.gitInstall Edge Stack to use as an ingress controller for your cluster. We need an ingress controller to allow access to the web app from the internet.
Change into the repo directory, then into
k8s-config, and apply the YAML files to deploy Edge Stack.cd amb-code-quickstart-app/k8s-configkubectl apply -f 1-aes-crds.yml && kubectl wait --for condition=established --timeout=90s crd -lproduct=aeskubectl apply -f 2-aes.yml && kubectl wait -n ambassador deploy -lproduct=aes --for condition=available --timeout=90sInstall the web app by applying its manifest:
kubectl apply -f edgy-corp-web-app.yamlWait a few moments for the external load balancer to become available, then retrieve its IP address:
kubectl get service -n ambassador ambassador -o jsonpath='{.status.loadBalancer.ingress[0].ip}'
|  |
Developing with Telepresence
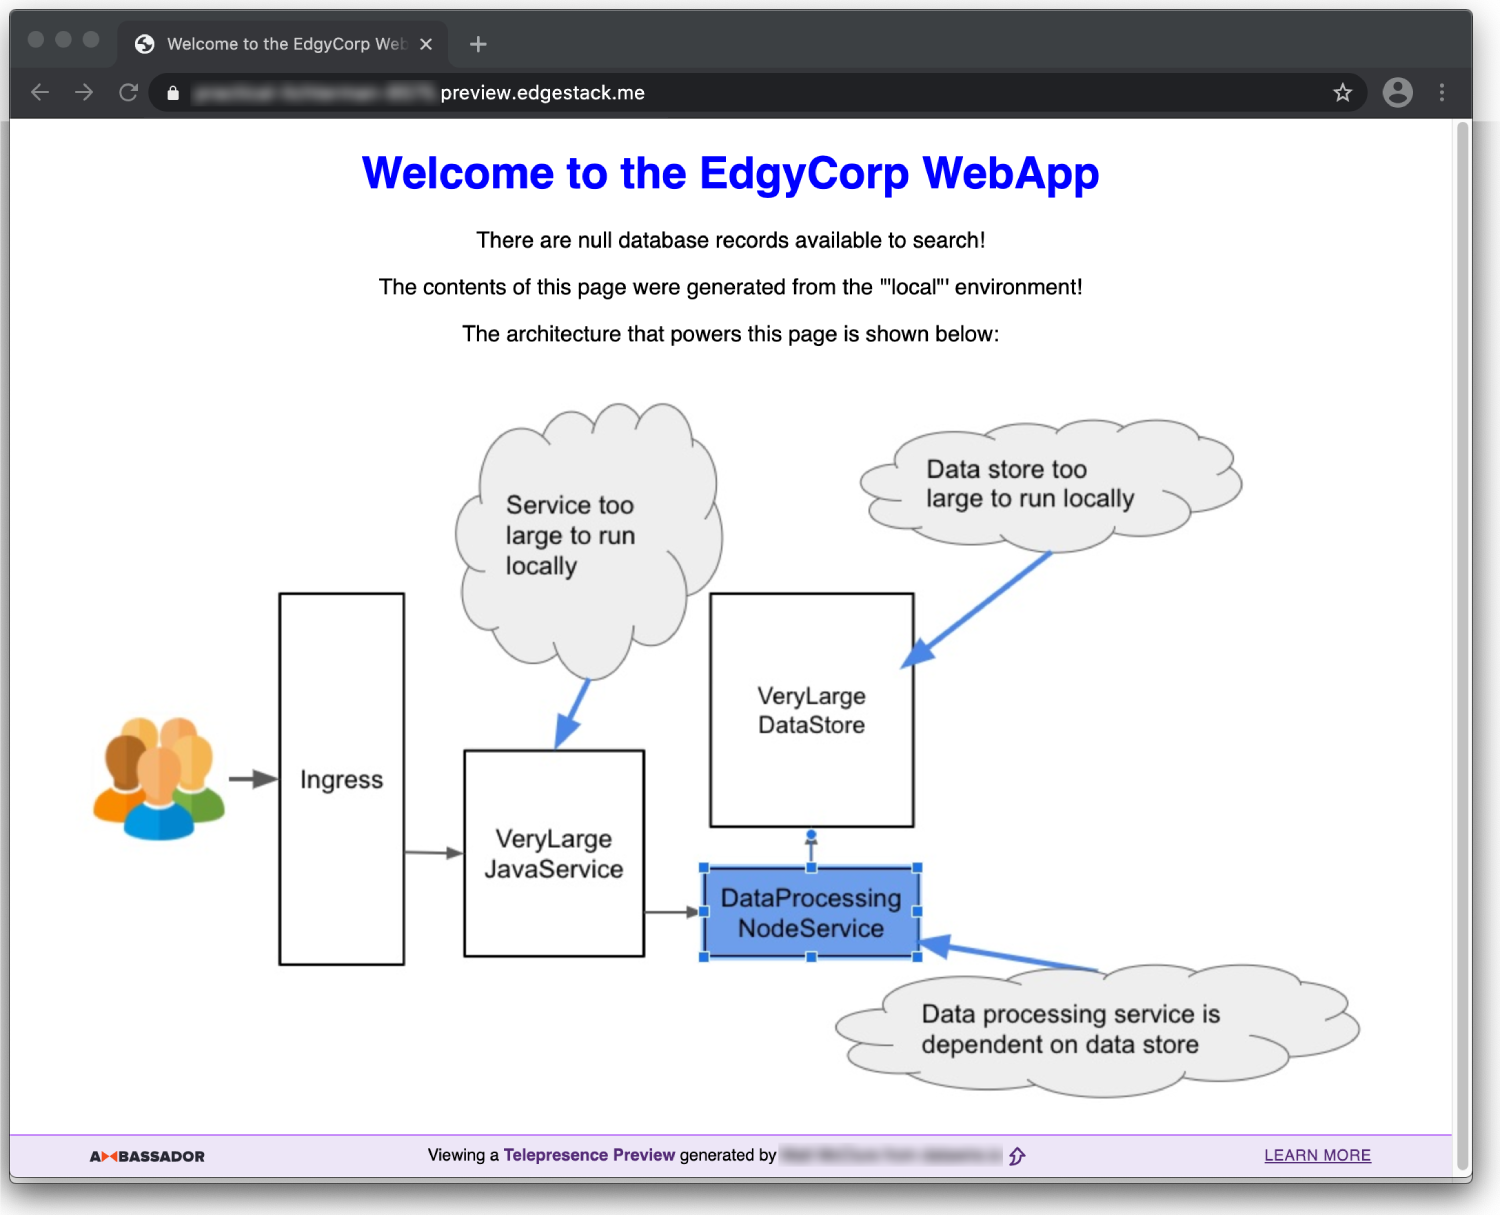
Now that your app is all wired up you're ready to start doing development work with Telepresence. Imagine you are a Java developer and first on your to-do list for the day is a change on the DataProcessingNodeService. One thing this service does is set the color for the title and a pod in the diagram. The production version of the app on the cluster uses green elements, but you want to see a version with these elements set to blue.
The DataProcessingNodeService service is dependent on the VeryLargeJavaService and VeryLargeDataStore services to run. Local development would require one of the two following setups, neither of which is ideal.
First, you could run the two dependent services on your laptop. However, as their names suggest, they are too large to run locally. This option also doesn't scale well. Two services isn't a lot to manage, but more complex apps requiring many more dependencies is not feasible to manage running on your laptop.
Second, you could run everything in a development cluster. However, the cycle of writing code then waiting on containers to build and deploy is incredibly disruptive. The lengthening of the inner dev loop in this way can have a significant impact on developer productivity.
Intercepting a Service
Alternatively, you can use Telepresence's intercept command to proxy traffic bound for a service to your laptop. This will let you test and debug services on code running locally without needing to run dependent services or redeploy code updates to your cluster on every change. It also will generate a preview URL, which loads your web app from the cluster ingress but with requests to the intercepted service proxied to your laptop.
You started this guide by installing the Telepresence CLI and logging into Ambassador Cloud. The Cloud dashboard is used to manage your intercepts and share them with colleagues. You must be logged in to create selective intercepts as we are going to do here.
In your terminal and run
telepresence list. This will connect to your cluster, install the Traffic Manager to proxy the traffic, and return a list of services that Telepresence is able to intercept.Navigate up one directory to the root of the repo then into
DataProcessingNodeService. Install the Node.js dependencies and start the app passing theblueargument, which is used by the app to set the title and pod color in the diagram you saw earlier.cd ../DataProcessingNodeServicenpm installnode app -c blueIn a new terminal window start the intercept with the command below. This will proxy requests to the
DataProcessingNodeServiceservice to your laptop. It will also generate a preview URL, which will let you view the app with the intercepted service in your browser.The intercept requires you specify the name of the deployment to be intercepted and the port to proxy.
telepresence intercept dataprocessingnodeservice --port 3000You will be prompted with a few options. Telepresence tries to intelligently determine the deployment and namespace of your ingress controller. Hit
enterto accept the default value ofambassador.ambassadorforIngress. For simplicity's sake, our app uses 80 for the port and does not use TLS, so use those options when prompted for theportandTLSsettings. Your output should be similar to this:$ telepresence intercept dataprocessingnodeservice --port 3000To create a preview URL, telepresence needs to know how clusteringress works for this service. Please Select the ingress to use.1/4: What's your ingress' layer 3 (IP) address?You may use an IP address or a DNS name (this is usually a"service.namespace" DNS name).[no default]: verylargejavaservice.default2/4: What's your ingress' layer 4 address (TCP port number)?[no default]: 80803/4: Does that TCP port on your ingress use TLS (as opposed to cleartext)?[default: n]:4/4: If required by your ingress, specify a different layer 5 hostname(TLS-SNI, HTTP "Host" header) to access this service.[default: verylargejavaservice.default]:Using deployment dataprocessingserviceinterceptedIntercept name : dataprocessingserviceState : ACTIVEDestination : 127.0.0.1:3000Intercepting : HTTP requests that match all of:header("x-telepresence-intercept-id") ~= regexp("86cb4a70-c7e1-1138-89c2-d8fed7a46cae:dataprocessingservice")Preview URL : https://<random-subdomain>.preview.edgestack.meLayer 5 Hostname: verylargejavaservice.default
|  |
|  |
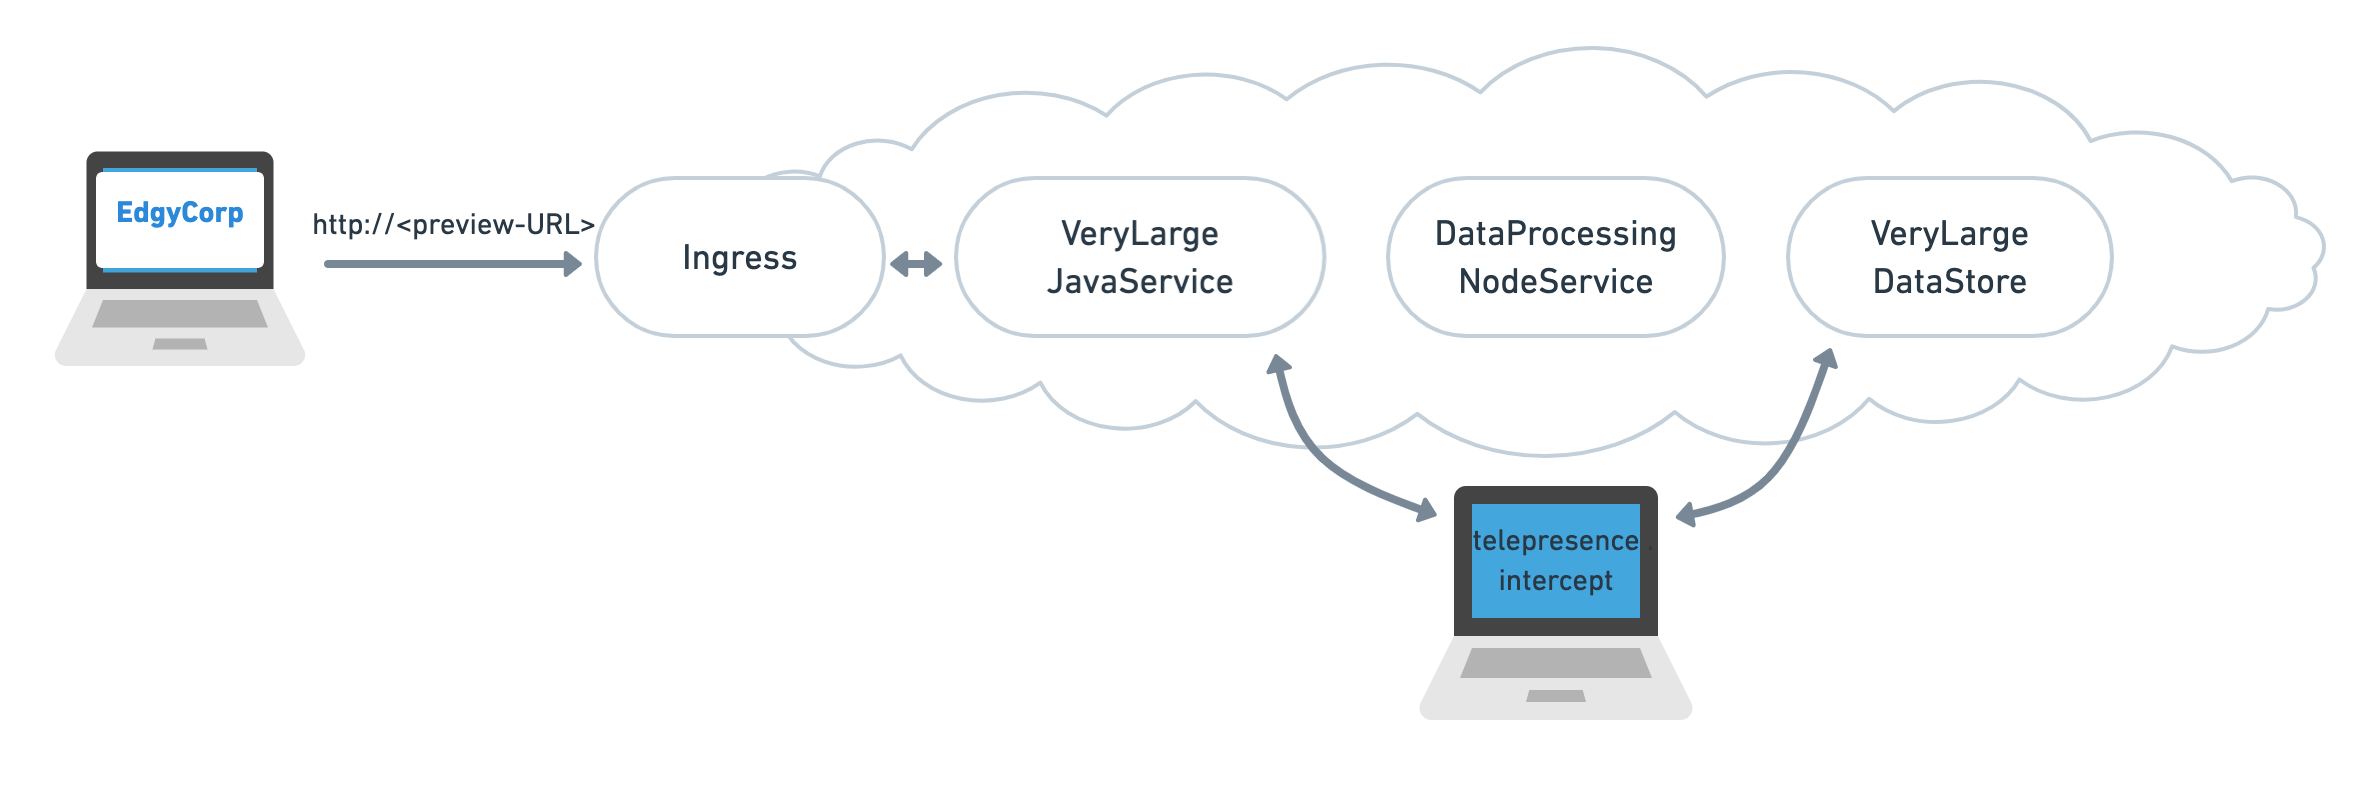
This diagram demonstrates the flow of requests using the intercept. The laptop on the left visits the preview URL, the request is redirected to the cluster ingress, and requests to and from the DataProcessingNodeService by other pods are proxied to the developer laptop running Telepresence.
Clean up your environment by first typing
Ctrl+Cin the terminal running Node. Then stop the intercept with theleavecommand andquitto stop the daemon. Finally, useuninstall --everythingto remove the Traffic Manager and Agents from your cluster.telepresence leave dataprocessingnodeservicetelepresence quittelepresence uninstall --everythingRefresh the dashboard page again and you will see the intercept was removed after running the
leavecommand. Refresh the browser tab with the preview URL and you will see that it has been disabled.
 What's Next?
Telepresence and preview URLS open up powerful possibilities for collaborating with your colleagues and others outside of your organization.
Learn more about how Telepresence handles outbound sessions, allowing locally running services to interact with cluster services without an intercept.
Read the FAQs to learn more about uses cases and the technical implementation of Telepresence.
Questions?
We’re here to help. If you have questions, join our Slack or contact us.