
Consul Integration
Consul is a widely used service mesh. You can use Consul with Ambassador Edge Stack, as it natively supports Consul for service discovery and end-to-end TLS (including mTLS between services). This capability is particularly useful when deploying Ambassador Edge Stack in so-called hybrid clouds, where applications are deployed on VMs and Kubernetes. In this environment, Ambassador Edge Stack can securely route over TLS to any application regardless of where it is deployed.
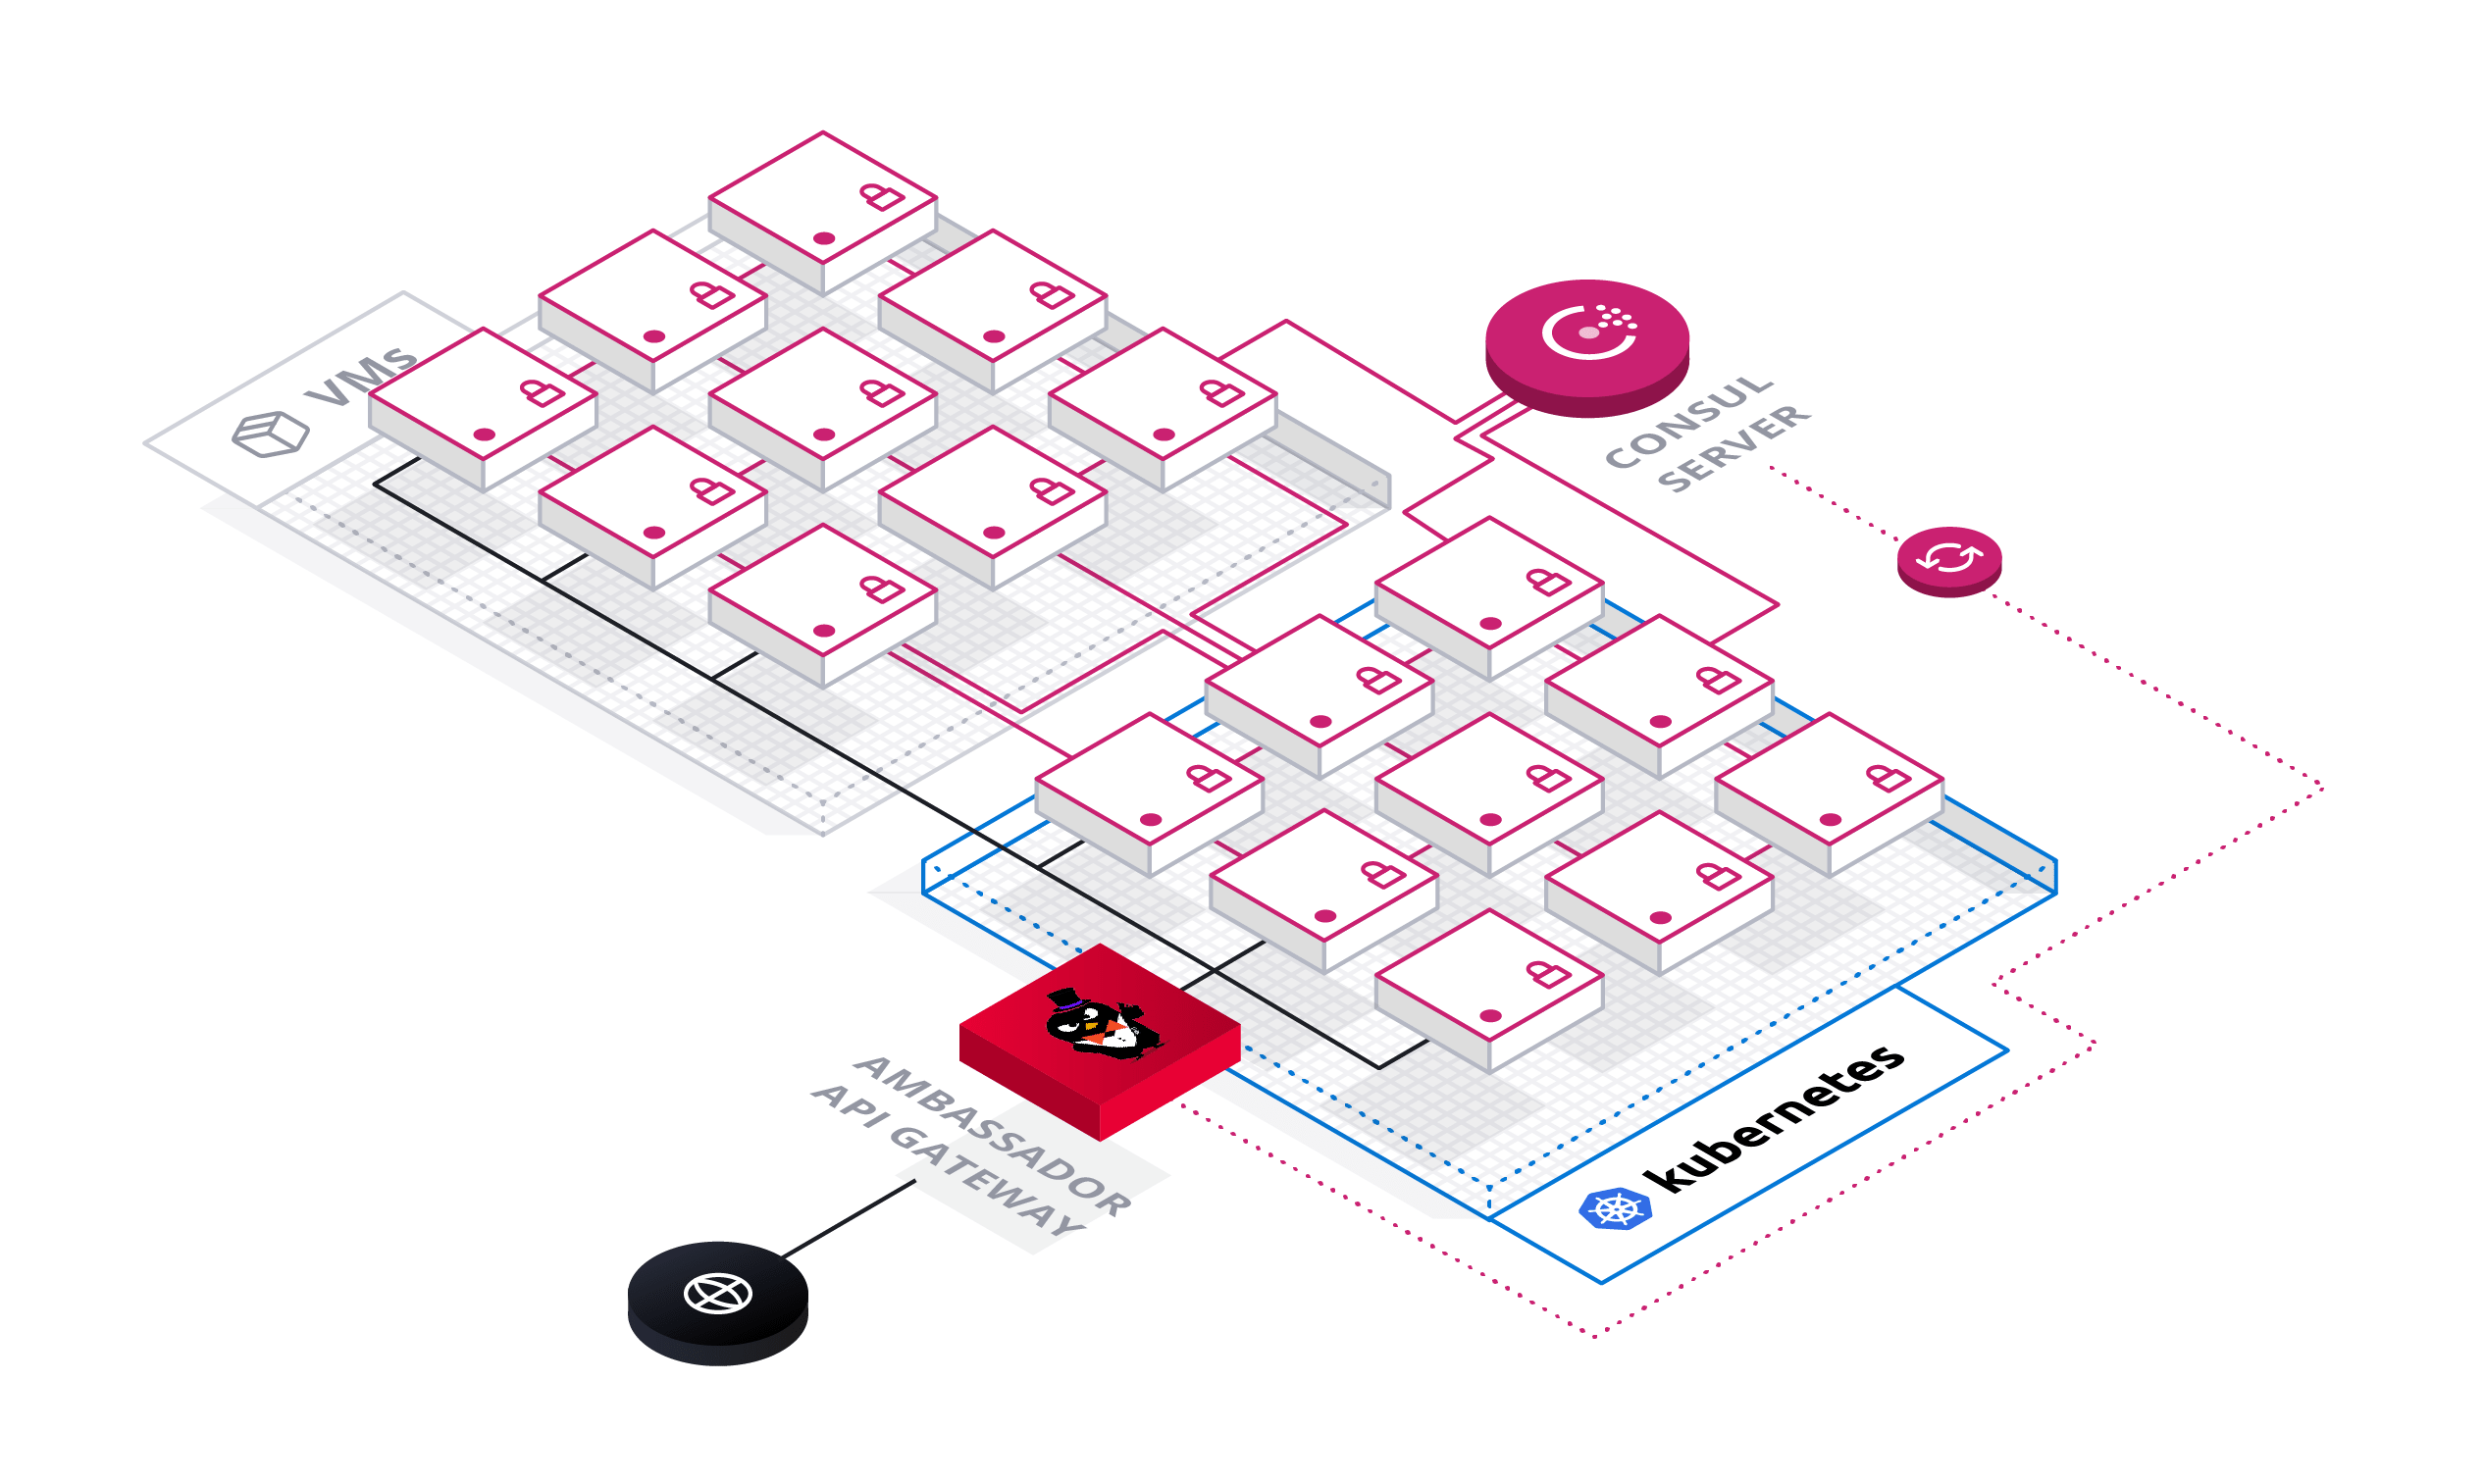
Architecture Overview
In this architecture, Consul serves as the source of truth for your entire data center, tracking available endpoints, service configuration, and secrets for TLS encryption. New applications and services automatically register themselves with Consul using the Consul agent or API. When a request is sent through Ambassador Edge Stack, Ambassador Edge Stack sends the request to an endpoint based on the data in Consul.
Getting Started
In this guide, you will register a service with Consul and use Ambassador Edge Stack to dynamically route requests to that service based on Consul's service discovery data. If you already have Ambassador Edge Stack installed, you will just need to configure the ConsulResolver in step 3.
Install and configure Consul (instructions). Consul can be deployed anywhere in your data center.
Deploy Ambassador Edge Stack. Note: If this is your first time deploying Ambassador Edge Stack, reviewing the quick start guide is strongly recommended.
kubectl apply -f https://www.getambassador.io/yaml/ambassador/ambassador-rbac.yamlIf you're on GKE, or haven't previously created the Ambassador Edge Stack service, please see the quick start guide.
Configure Ambassador Edge Stack to look for services registered to Consul by creating the
ConsulResolver:---apiVersion: getambassador.io/v2kind: ConsulResolvermetadata:name: consul-dc1spec:address: consul-server.default.svc.cluster.local:8500datacenter: dc1This will tell Ambassador Edge Stack that Consul is a service discovery endpoint. Save the configuration to a file (e.g.,
ambassador-service.yaml, and apply this configuration withkubectl apply -f ambassador-service.yaml. For more information about resolver configuration, see the resolver reference documentation. (If you're using Consul deployed elsewhere in your data center, make sure theaddresspoints to your Consul FQDN or IP address).
Routing to Consul Services
You'll now register a demo application with Consul, and show how Ambassador Edge Stack can route to this application using endpoint data from Consul. To simplify this tutorial, you'll deploy the application in Kubernetes, although in practice this application can be deployed anywhere in your data center (e.g., on VMs).
Deploy the QOTM demo application. The QOTM application contains code to automatically register itself with Consul, using the CONSUL_IP and POD_IP environment variables specified within the QOTM container spec.
---apiVersion: apps/v1kind: Deploymentmetadata:name: qotmspec:replicas: 1strategy:type: RollingUpdateselector:matchLabels:app: qotmtemplate:metadata:labels:app: qotmannotations:"consul.hashicorp.com/connect-inject": "false"spec:containers:- name: qotmimage: docker.io/datawire/qotm:1.7ports:- name: http-apicontainerPort: 5000env:- name: CONSUL_IPvalueFrom:fieldRef:fieldPath: status.hostIP- name: POD_IPvalueFrom:fieldRef:fieldPath: status.podIPreadinessProbe:httpGet:path: /healthport: 5000initialDelaySeconds: 30periodSeconds: 3resources:limits:cpu: "0.1"memory: 100MiSave the above to a file called
qotm.yamland runkubectl apply -f qotm.yaml. This will register the QOTM pod as a Consul service with the nameqotm-consuland the IP address of the QOTM pod.Verify the QOTM pod has been registered with Consul. You can verify the QOTM pod is registered correctly by accessing the Consul UI.
kubectl port-forward service/consul-ui 8500:80Go to
http://localhost:8500/from a web browser and you should see a service namedqotm-consul.Create a
Mappingfor theqotm-consulservice.---apiVersion: getambassador.io/v2kind: Mappingmetadata:name: consul-qotm-mappingspec:prefix: /qotm-consul/service: qotm-consulresolver: consul-dc1load_balancer:policy: round_robin
Save the above YAML to a file named qotm-mapping.yaml, and use kubectl apply -f qotm-mapping.yaml to apply this configuration to your Kubernetes cluster. Note that in the above config:
resolvermust be set to theConsulResolverthat you created in the previous stepload_balancermust be set to configure Ambassador Edge Stack to route directly to the QOTM application endpoint(s) that are retrieved from Consul.
Send a request to the
qotm-consulAPI.curl -L http://$AMBASSADOR_IP/qotm-consul/{"hostname":"qotm-749c675c6c-hq58f","ok":true,"quote":"The last sentence you read is often sensible nonsense.","time":"2019-03-29T22:21:42.197663","version":"1.7"}
Congratulations! You're successfully routing traffic to the QOTM application, the location of which is registered in Consul.
Encrypted TLS
Ambassador Edge Stack can also use certificates stored in Consul to originate encrypted TLS connections from Ambassador Edge Stack to the Consul service mesh. This requires the use of the Ambassador Edge Stack Consul connector. The following steps assume you've already set up Consul for service discovery, as detailed above.
The Ambassador Consul connector retrieves the TLS certificate issued by the Consul CA and stores it in a Kubernetes secret for Ambassador Edge Stack to use. Deploy the Ambassador Edge Stack Consul Connector with
kubectl:kubectl apply -f https://www.getambassador.io/yaml/consul/ambassador-consul-connector.yaml
This will install into your cluster:
- RBAC resources.
- The Consul connector service.
- A
TLSContextnamedambassador-consulto load theambassador-consul-connectsecret into Ambassador Edge Stack.
Note: If you have previously installed the consul connector in the default namespace in your cluster, you'll want to clean up the old (and now unused) resources in the default namespace.
If you are installing the consul connector in your cluster for the first time, you can ignore this and move on to step two.
Having duplicates of the Consul connector resources in the ambassador and default namespaces should not impact the functionality of the Consul connector, but it's good practice to clean up unused resources.
First, delete the service account, Consul connector service and TLSContext resources from the default namespace:
```kubectl delete -f https://www.getambassador.io/yaml/consul/ambassador-consul-connector-old.yaml```
Then, delete the secret created by the connector service in the default namespace.
ambassador-consul-connect is the default name of the secret,
but if you have set the _AMBASSADOR_TLS_SECRET_NAME environment variable on the consul-connect-injector-webhook-deployment deployment,
you should sub in that secret name value for ambassador-consul-connect in the command below.
```kubectl delete secret -n default ambassador-consul-connect```
Deploy a new version of the demo application, and configure it to inject the Consul sidecar proxy by setting
"consul.hashicorp.com/connect-inject"totrue. Note that in this version of the configuration, you do not have to configure environment variables for the location of the Consul server:---apiVersion: apps/v1kind: Deploymentmetadata:name: qotm-mtlsspec:replicas: 1strategy:type: RollingUpdateselector:matchLabels:app: qotmtemplate:metadata:labels:app: qotmannotations:"consul.hashicorp.com/connect-inject": "true"spec:containers:- name: qotmimage: docker.io/datawire/qotm:1.7ports:- name: http-apicontainerPort: 5000readinessProbe:httpGet:path: /healthport: 5000initialDelaySeconds: 30periodSeconds: 3resources:limits:cpu: "0.1"memory: 100MiCopy this YAML in a file called
qotm-consul-mtls.yamland apply it to your cluster withkubectl apply -f qotm-consul-mtls.yaml.This will deploy a demo application called
qotm-mtlswith the Connect sidecar proxy. The Connect proxy will register the application with Consul, require TLS to access the application, and expose other Consul Service Segmentation features.Verify the
qotm-mtlsapplication is registered in Consul by accessing the Consul UI onhttp://localhost:8500/after running:kubectl port-forward service/consul-ui 8500:80You should see a service registered as
qotm-proxy.Create a
Mappingto route to theqotm-mtls-proxyservice in Consul---apiVersion: getambassador.io/v2kind: Mappingmetadata:name: consul-qotm-mapping-tlsspec:prefix: /qotm-consul-tls/service: qotm-sidecar-proxyresolver: consul-dc1tls: ambassador-consulload_balancer:policy: round_robinresolvermust be set to theConsulResolvercreated when configuring Ambassador Edge Stacktlsmust be set to theTLSContextstoring the Consul mTLS certificates (e.g.ambassador-consul)load_balancermust be set to configure Ambassador Edge Stack to route directly to the application endpoint(s) that are retrieved from Consul
Copy this YAML to a file named
qotm-consul-mtls-mapping.yamland apply it to your cluster withkubectl apply -f qotm-consul-mtls-mapping.yaml.Send a request to the
/qotm-consul-tls/API.curl -L $AMBASSADOR_IP/qotm-consul-tls/{"hostname":"qotm-6c6dc4f67d-hbznl","ok":true,"quote":"A principal idea is omnipresent, much like candy.","time":"2019-04-17T19:27:54.758361","version":"1.7"}
Environment Variables
The Consul Connector can be configured with the following environment variables. The defaults will be best for most use-cases.
| Environment Variable | Description | Default |
|---|---|---|
| _AMBASSADOR_ID | Set the Ambassador ID so multiple instances of this integration can run per-Cluster when there are multiple Ambassadors (Required if AMBASSADOR_ID is set in your Ambassador deployment) | "" |
| _CONSUL_HOST | Set the IP or DNS name of the target Consul HTTP API server | 127.0.0.1 |
| _CONSUL_PORT | Set the port number of the target Consul HTTP API server | 8500 |
| _AMBASSADOR_TLS_SECRET_NAME | Set the name of the Kubernetes v1.Secret created by this program that contains the Consul-generated TLS certificate. | $AMBASSADOR_ID-consul-connect |
| _AMBASSADOR_TLS_SECRET_NAMESPACE | Set the namespace of the Kubernetes v1.Secret created by this program. | (same Namespace as the Pod running this integration) |
More Information
For more about Ambassador Edge Stack's integration with Consul, read the service discovery configuration documentation.
Questions?
We’re here to help. If you have questions, join our Slack or contact us.