
Service Preview and Edge Control
One of the challenges in adopting Kubernetes and microservices is the development and testing workflow. Creating and maintaining a full development environment with many microservices and their dependencies is complex and hard.
Service Preview addresses this challenge by connecting your CI system or local development infrastructure to the Kubernetes cluster, and dynamically routing specific requests to your local environment.
Service Preview in action
When Service Preview is used, incoming requests get routed by Ambassador to a Traffic Agent, which then routes traffic to the microservice. When a request meets a specific criteria (e.g., it has a specific HTTP header value), the Traffic Agent will route that request to the microservice running locally. The following video shows Service Preview in more detail:
Preview URLs
Ambassador Edge Stack, when used as your cluster's API gateway, offers the ability to use preview URLs. Just as you can access your application at a specific URL, you can access the development version of the same application through a Preview URL. When AES detects a Preview URL at the edge, it rewrites the request to look like a normal request but with a service preview header added.
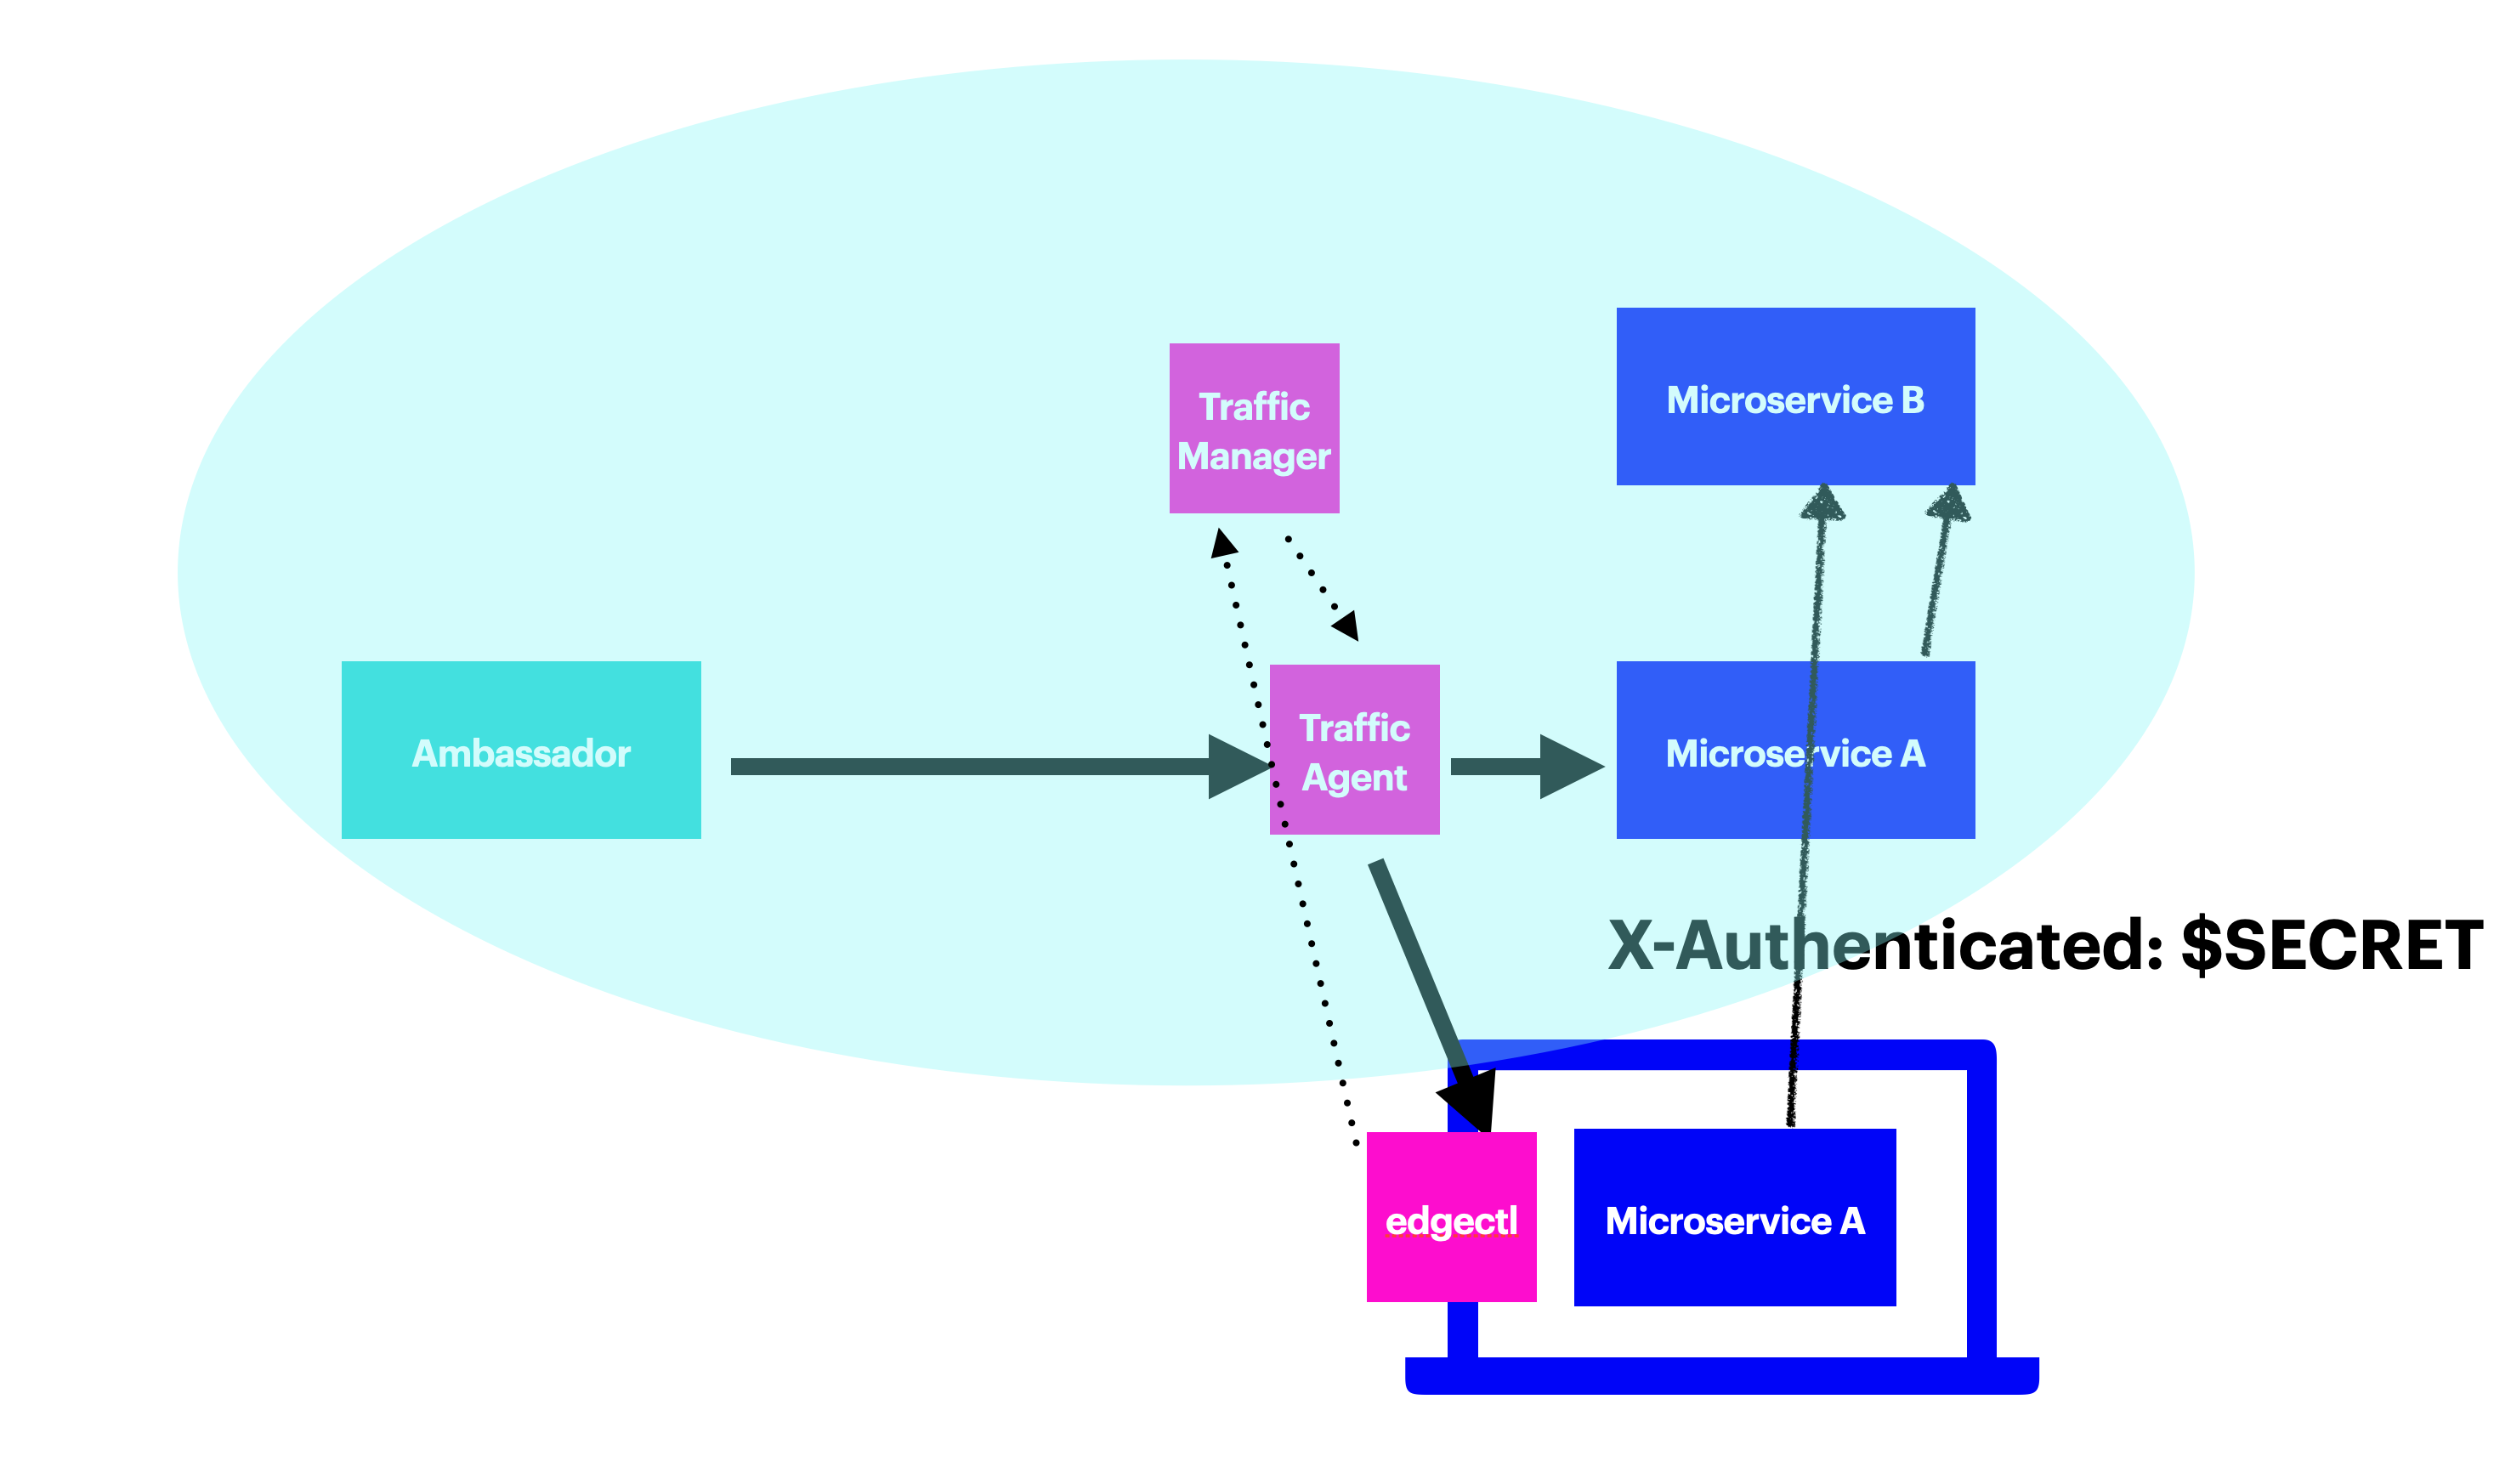
Service Preview Components
There are three main components to Service Preview:
The Traffic Agent, which controls routing to the microservice. The Traffic Agent is deployed as a sidecar on the same pod as your microservice (behind the scenes, it's a special configuration of the basic Ambassador Edge Stack image). The Traffic Agent sidecar can be manually configured or automatically injected in any pod with a specific annotation.
The Traffic Manager, which manages the different instances of the Traffic Agent, and is deployed in the cluster.
The Edge Control local client, which runs in your local environment (Linux or Mac OS X). The client is the command line interface to the Traffic Manager.
For Preview URLs to function, Ambassador Edge Stack must be running as your API gateway.
Configuring Service Preview
To get started with Service Preview, you'll need to install Traffic Manager, configure a Traffic Agent, and then download and install the edgectl client.
To use Preview URLs, you must enable preview URL processing in one or more Host resources used by Ambassador Edge Stack.
Traffic Manager
The Traffic Manager is the central point of communication between Traffic Agents in the cluster and Edge Control Daemons on developer workstations.
- Ensure that you have a fully functional Ambassador Edge Stack installation with a valid license key installed in your cluster.
- Save the manifest below into a file called
traffic-manager.yaml. - Apply the manifest to your cluster with
kubectl apply -f traffic-manager.yaml.
# This is traffic-manager.yaml---apiVersion: v1kind: ServiceAccountmetadata:name: traffic-managernamespace: ambassador---apiVersion: rbac.authorization.k8s.io/v1beta1kind: ClusterRolemetadata:name: traffic-managerrules:- apiGroups: [""]resources: ["namespaces", "services", "pods", "secrets"]verbs: ["get", "list", "watch"]---apiVersion: rbac.authorization.k8s.io/v1beta1kind: ClusterRoleBindingmetadata:name: traffic-managerroleRef:apiGroup: rbac.authorization.k8s.iokind: ClusterRolename: traffic-managersubjects:- kind: ServiceAccountname: traffic-managernamespace: ambassador---apiVersion: v1kind: Servicemetadata:name: telepresence-proxynamespace: ambassadorspec:type: ClusterIPclusterIP: Noneselector:app: telepresence-proxyports:- name: sshdprotocol: TCPport: 8022- name: apiprotocol: TCPport: 8081---apiVersion: apps/v1kind: Deploymentmetadata:name: telepresence-proxynamespace: ambassadorlabels:app: telepresence-proxyspec:replicas: 1selector:matchLabels:app: telepresence-proxytemplate:metadata:labels:app: telepresence-proxyspec:containers:- name: telepresence-proxyimage: docker.io/datawire/aes:1.5.5command: [ "traffic-manager" ]ports:- name: sshdcontainerPort: 8022env:- name: AMBASSADOR_NAMESPACEvalueFrom:fieldRef:fieldPath: metadata.namespace- name: REDIS_URLvalue: ambassador-redis:6379volumeMounts:- mountPath: /tmp/ambassador-pod-infoname: ambassador-pod-inforestartPolicy: AlwaysserviceAccountName: traffic-managerterminationGracePeriodSeconds: 0volumes:- downwardAPI:items:- fieldRef:fieldPath: metadata.labelspath: labelsname: ambassador-pod-info
Note that if you do not wish to grant read privileges on Secrets to the traffic-manager ServiceAccount, you may mount the ambassador-edge-stack secret containing the license key in an extra volume and reference it using the AMBASSADOR_LICENSE_FILE environment variable:
env:- name: AMBASSADOR_LICENSE_FILEvalue: /.config/ambassador/license-key[...]volumeMounts:- mountPath: /.config/ambassadorname: ambassador-edge-stack-secretsreadOnly: true[...]volumes:- name: ambassador-edge-stack-secretssecret:secretName: ambassador-edge-stack
Traffic Agent
Any microservice running in a cluster with a traffic manager can opt in to intercept functionality by including the Traffic Agent in its pods.
Configuring RBAC
Since the Traffic Agent is built on Ambassador Edge Stack, it needs a subset of the same RBAC permissions that Ambassador does. The easiest way to provide this is to create a ServiceAccount in your service's namespace, bound to the traffic-agent Role or ClusterRole:
---apiVersion: v1kind: ServiceAccountmetadata:name: traffic-agentnamespace: defaultlabels:product: aes---## After creating the ServiceAccount, create a service-account-token for traffic-agent with a matching name.## Since the ambassador-injector will use this token name, it must be deterministic and not auto-generated.apiVersion: v1kind: Secretmetadata:name: traffic-agentnamespace: defaultannotations:kubernetes.io/service-account.name: traffic-agenttype: kubernetes.io/service-account-token---apiVersion: rbac.authorization.k8s.io/v1beta1kind: ClusterRolemetadata:name: traffic-agentrules:- apiGroups: [""]resources: [ "namespaces", "services", "secrets" ]verbs: ["get", "list", "watch"]- apiGroups: [ "getambassador.io" ]resources: [ "*" ]verbs: ["get", "list", "watch", "update"]---apiVersion: rbac.authorization.k8s.io/v1beta1kind: ClusterRoleBindingmetadata:name: traffic-agentlabels:product: aesroleRef:apiGroup: rbac.authorization.k8s.iokind: ClusterRolename: traffic-agentsubjects:- name: traffic-agentnamespace: defaultkind: ServiceAccount
Copy the above YAML into traffic-agent-rbac.yaml and, if necessary, edit the two namespaces appropriately. Apply it:
$ kubectl apply -f traffic-agent-rbac.yamlserviceaccount/traffic-agent createdclusterrolebinding.rbac.authorization.k8s.io/traffic-agent created
If you want to include the Traffic Agent with multiple services, they can all use the same ServiceAccount name, as long as it exists in every namespace.
Alternatively, if you already have specific ServiceAccounts defined for each of your pod, you may grant all of them the additional traffic-agent permissions:
---apiVersion: rbac.authorization.k8s.io/v1beta1kind: ClusterRoleBindingmetadata:name: traffic-agentlabels:product: aesroleRef:apiGroup: rbac.authorization.k8s.iokind: ClusterRolename: traffic-agentsubjects:- name: system:serviceaccountskind: GroupapiGroup: rbac.authorization.k8s.io
Manual Traffic Agent Sidecar Configuration
You'll need to modify the YAML for each microservice to include the Traffic Agent. We'll start with a set of manifests for a simple microservice:
# This is hello.yaml---apiVersion: v1kind: Servicemetadata:name: hellolabels:app: hellospec:selector:app: helloports:- protocol: TCPport: 80targetPort: http # Application port---apiVersion: apps/v1kind: Deploymentmetadata:name: hellolabels:app: hellospec:replicas: 1selector:matchLabels:app: hellotemplate:metadata:labels:app: hellospec:containers: # Application container- name: helloimage: docker.io/datawire/hello-world:latestports:- name: httpcontainerPort: 8000 # Application port
In order to run the sidecar:
- you need to include the Traffic Agent container in the microservice pod;
- you need to switch the microservice's
Servicedefinition to point to the Traffic Agent's listening port (using named ports such ashttporhttpsallow us to change thePoddefinition without changing theServicedefinition); and - you need to tell the Traffic Agent how to set up for the microservice, using environment variables.
Here is a modified set of manifests that includes the Traffic Agent (with notes below):
# This is hello-intercept.yaml---apiVersion: v1kind: Servicemetadata:name: hellolabels:app: hellospec:selector:app: helloports:- protocol: TCPport: 80targetPort: http # Traffic Agent listen port (note 1)---apiVersion: apps/v1kind: Deploymentmetadata:name: hellolabels:app: hellospec:replicas: 1selector:matchLabels:app: hellotemplate:metadata:labels:app: hellospec:containers:- name: hello # Application container (note 2)image: docker.io/datawire/hello-world:latestports:- containerPort: 8000 # Application port- name: traffic-agent # Traffic Agent container (note 3)image: docker.io/datawire/aes:1.5.5 # (note 4)ports:- name: httpcontainerPort: 9900 # Traffic Agent listen portenv:- name: AGENT_SERVICE # Name to use for intercepting (note 5)value: hello- name: AGENT_PORT # Port on which to talk to the microservice (note 6)value: "8000"- name: AGENT_MANAGER_NAMESPACE # Namespace for contacting the Traffic Manager (note 7)value: ambassador- name: AMBASSADOR_NAMESPACE # Namespace in which this microservice is running (note 8)valueFrom:fieldRef:fieldPath: metadata.namespace- name: AMBASSADOR_SINGLE_NAMESPACE # Traffic Agent container can run in a single-namespace (note 9)value: "true"- name: AGENT_LISTEN_PORT # Port on which to listen for connections (note 10)value: "9900"serviceAccountName: traffic-agent # The pod runs with traffic-agent RBAC
Key points include:
- Note 1: The
Servicenow points to the Traffic Agent’s listen port (namedhttp, 9900) instead of the application’s port (8000). - Note 2: The microservice's application container is actually unchanged.
- Note 3: The Traffic Agent's container has been added.
- Note 4: The Traffic Agent is included in the AES image.
- Note 5: The
AGENT_SERVICEenvironment variable is mandatory. It sets the name that the Traffic Agent will report to the Traffic Manager for this microservice: you will have to provide this name to intercept this microservice. - Note 6: The
AGENT_PORTenvironment variable is mandatory. It tells the Traffic Agent the local port on which the microservice is listening. - Note 7: The
AGENT_MANAGER_NAMESPACEenvironment variable tells the Traffic Agent the namespace in which it will be able to find the Traffic Manager. If not present, it defaults to theambassadornamespace. - Note 8: The
AMBASSADOR_NAMESPACEenvironment variable is mandatory. It lets the Traffic Agent tell the Traffic Manager the namespace in which the microservice is running. - Note 9: The
AMBASSADOR_SINGLE_NAMESPACEenvironment variable tells the Traffic Agent to watch resources only in its current namespace. This allows thetraffic-agentServiceAccountto only haveRolepermissions instead of a cluster-wideClusterRole. - Note 10: The
AGENT_LISTEN_PORTenvironment variable tells the Traffic Agent the port on which to listen for incoming connections. TheServicemust point to this port (see Note 1). If not present, it defaults to port 9900.
Automatic Traffic Agent Sidecar Injection
If you wish to allow automatic Traffic Agent sidecar injection in any deployment without having to manually configure the extra container, you may install the ambassador-injector AdmissionController:
Generate a (self-signed) TLS certificate and key to be used by the webhook server. The certificate will be issued for the Common Name (CN) of
ambassador-injector.ambassador.svc, which is the cluster-internal DNS name for the service. TLS is mandatory when using aMutatingWebhookConfiguration. The certificates generated in this example are valid for 365 days:# Generate the CA cert and private keyopenssl req -days 365 -nodes -new -x509 -keyout ca.key -out ca.crt \-subj "/CN=Ambassador Edge Stack Admission Controller Webhook CA"# Generate the private key for the webhook serveropenssl genrsa -out key.pem 2048# Generate a Certificate Signing Request (CSR) for the private key, and sign it with the private key of the CA.openssl req -new -key key.pem -subj "/CN=ambassador-injector.ambassador.svc" \| openssl x509 -req -days 365 -CA ca.crt -CAkey ca.key -CAcreateserial -out crt.pem# Encode the certificatescat ca.crt | base64 > ca.bundle.base64cat key.pem | base64 > key.pem.base64cat crt.pem | base64 > crt.pem.base64Replace the
CA_BUNDLE_BASE64,CRT_PEM_BASE64andKEY_PEM_BASE64placeholders using the values from above, and save the manifest below into a file calledambassador-injector.yaml.Apply the manifest to your cluster with
kubectl apply -f ambassador-injector.yaml.
---kind: SecretapiVersion: v1metadata:name: ambassador-injector-tlsnamespace: ambassadortype: Opaquedata:crt.pem: CRT_PEM_BASE64key.pem: KEY_PEM_BASE64---apiVersion: apps/v1kind: Deploymentmetadata:name: ambassador-injectornamespace: ambassadorspec:replicas: 1selector:matchLabels:app.kubernetes.io/name: ambassador-injectorapp.kubernetes.io/instance: ambassadortemplate:metadata:labels:app.kubernetes.io/name: ambassador-injectorapp.kubernetes.io/instance: ambassadorspec:containers:- name: webhookimage: docker.io/datawire/aes:1.5.5command: [ "aes-injector" ]env:- name: TRAFFIC_AGENT_IMAGE # Mandatory. The Traffic Agent is included in the AES image.value: docker.io/datawire/aes:1.5.5- name: TRAFFIC_AGENT_SERVICE_ACCOUNT_NAME # Optional. The Injector can configure the sidecar to use a specific ServiceAccount and service-account-token. if unspecified, the original Pod ServiceAccount is used.value: traffic-agent- name: TRAFFIC_AGENT_AGENT_LISTEN_PORT # Optional. The port on which the Traffic Agent will listen. Defaults to "9900".value: "9900"- name: AGENT_MANAGER_NAMESPACE # Optional. Namespace for contacting the Traffic Manager. Defaults to "ambassador".value: ambassadorports:- containerPort: 8443name: httpslivenessProbe:httpGet:path: /healthzport: httpsscheme: HTTPSvolumeMounts:- mountPath: /var/run/secrets/tlsname: tlsreadOnly: truevolumes:- name: tlssecret:secretName: ambassador-injector-tls---apiVersion: v1kind: Servicemetadata:name: ambassador-injectornamespace: ambassadorspec:type: ClusterIPselector:app.kubernetes.io/name: ambassador-injectorapp.kubernetes.io/instance: ambassadorports:- name: ambassador-injectorport: 443targetPort: https---apiVersion: admissionregistration.k8s.io/v1beta1kind: MutatingWebhookConfigurationmetadata:name: ambassador-injector-webhook-configwebhooks:- name: ambassador-injector.getambassador.ioclientConfig:service:name: ambassador-injectornamespace: ambassadorpath: "/traffic-agent"caBundle: CA_BUNDLE_BASE64failurePolicy: Ignorerules:- operations: ["CREATE"]apiGroups: [""]apiVersions: ["v1"]resources: ["pods"]
Once the ambassador-injector is installed, you may modify your service manifest to include automatic Traffic Agent sidecar injection. Using the example hello.yaml deployment from above, enabling sidecar injection is easy using the getambassador.io/inject-traffic-agent: enabled annotation on any Pod definition:
# This is hello-automatic-injection.yaml---apiVersion: v1kind: Servicemetadata:name: hellolabels:app: hellospec:selector:app: helloports:- protocol: TCPport: 80targetPort: http # Application port---apiVersion: apps/v1kind: Deploymentmetadata:name: hellolabels:app: hellospec:replicas: 1selector:matchLabels:app: hellotemplate:metadata:annotations:getambassador.io/inject-traffic-agent: enabled # Enable automatic Traffic Agent sidecar injectionlabels:app: hellospec:containers: # Application container- name: helloimage: docker.io/datawire/hello-world:latestports:- name: httpcontainerPort: 8000 # Application port unchanged, ambassador-injector will detect named ports `http` and `https` and reconfigure port settings on the Pod.
TLS Support
If other microservices in the cluster expect to speak TLS to this microservice, tell the Traffic Agent to terminate TLS:
- Set the
AGENT_TLS_TERM_SECRETenvironment variable, or thegetambassador.io/inject-terminating-tls-secretpod annotation if usingambassador-injector, to the name of a Kubernetes Secret that contains a TLS certificate - The Traffic Agent will terminate TLS on its listen port (named
httpsinstead ofhttp; 9900 by default) using the named certificate - The Traffic Agent will not accept cleartext communication when configured to terminate TLS
If this microservice expects incoming requests to speak TLS, tell the Traffic Agent to originate TLS:
- Set the
AGENT_TLS_ORIG_SECRETenvironment variable, or thegetambassador.io/inject-originating-tls-secretpod annotation if usingambassador-injector, to the name of a Kubernetes Secret that contains a TLS certificate - The Traffic Agent will use that certificate originate HTTPS requests to the application
Ambassador Edge Stack
To enable Preview URLs, you must first enable preview URL processing in one or more Host resources. Ambassador Edge Stack uses Host resources to configure various aspects of a given host. Enabling preview URLs is as simple as adding the previewUrl section and setting enabled to true:
apiVersion: getambassador.io/v2kind: Hostmetadata:name: minimal-hostspec:hostname: host.example.comacmeProvider:email: julian@example.compreviewUrl:enabled: true
When you first edit your Host to enable preview URLs, you must reconnect to the cluster for the Edge Control Daemon to detect the change. This limitation will be removed in the future.
Questions?
We’re here to help. If you have questions, join our Slack or contact us.